

Trolltunga Norway is one of the best hikes in the world. Map, checklist, directions. Here is the ultimate guide to everything you need to know to hike Trolltunga.
Hiking Trolltunga and sitting on the edge of the Troll’s Tongue was a dream come true. In preparation for this trip, I exhausted numerous travel blogs and emailed various local tourist offices in order to obtain as much practical information about the hike as possible. Unfortunately, there really wasn’t much information out there that could answer all my questions; until now!
My questions included: Is it really an expert hike? Will I be fit enough? How do I get there? What should I wear? Does it really take 12 hours? Do I need a compass? Is sitting on the tip of the tongue scary?
This article will attempt to answer all your questions by providing more practical information about the hike, from preparation to getting to and from Trolltunga. If you’re interested in hiking Preikestolen or Kjeragbolten, then don’t miss my post on Stavanger here.
2024 Update
Good news! The demoralizing step climb at the start of the hike can now be skipped over thanks to a new car park which has been created at the upper trailhead which is called P3 Mågelitopp. Hurray! This will save you a good 2 hours depending on your fitness level. Parking is limited to 30 spaces (NOK 600 per day) so get there early or book ahead at trolltunganorway.com/no. More details can be found on the Visit Norway website.
- Distance to Trolltunga: 20 km return hike
- Total ascent: approx. 800 m
- Estimated hiking time: 8–10 hours
- Fitness/Difficulty: Expert
- When to go: The ‘easiest’ time is when there is no snow on the ground, so between 1 June–30 September. Outside of this 1 October–31 May it’s advised that you go with a guide.
- What time: Start your day early and hike to Trolltunga in the morning so you have all day to come back down. Before 9 am is ideal.
Take out the guesswork with these Trolltongua Tour and Experiences
- Sunset Hike in Trolltunga with Overnight Glamping in an Arctic Dome from Tyssedal
- Tree Tenting and Hiking Excursion near Trolltunga in Hardanger
- Overnight Cliff Camping and Hiking near Trolltunga in Hardanger
Here are some of the questions I’ll cover.
Table of Contents
- What is Trolltunga?
- How Long is the Hike?
- Am I Fit Enough?
- When Should I Go to Trolltunga?
- What Should I Expect? (Trail breakdown)
- How Do I Get to the Tip?
- What is the Journey Back Like?
- What Should I Wear and Pack?
- General Tips
- How to Get to Trolltunga
- Where Should I Stay?
If I haven’t answered all your questions then please feel free to ask me in the comments section below.
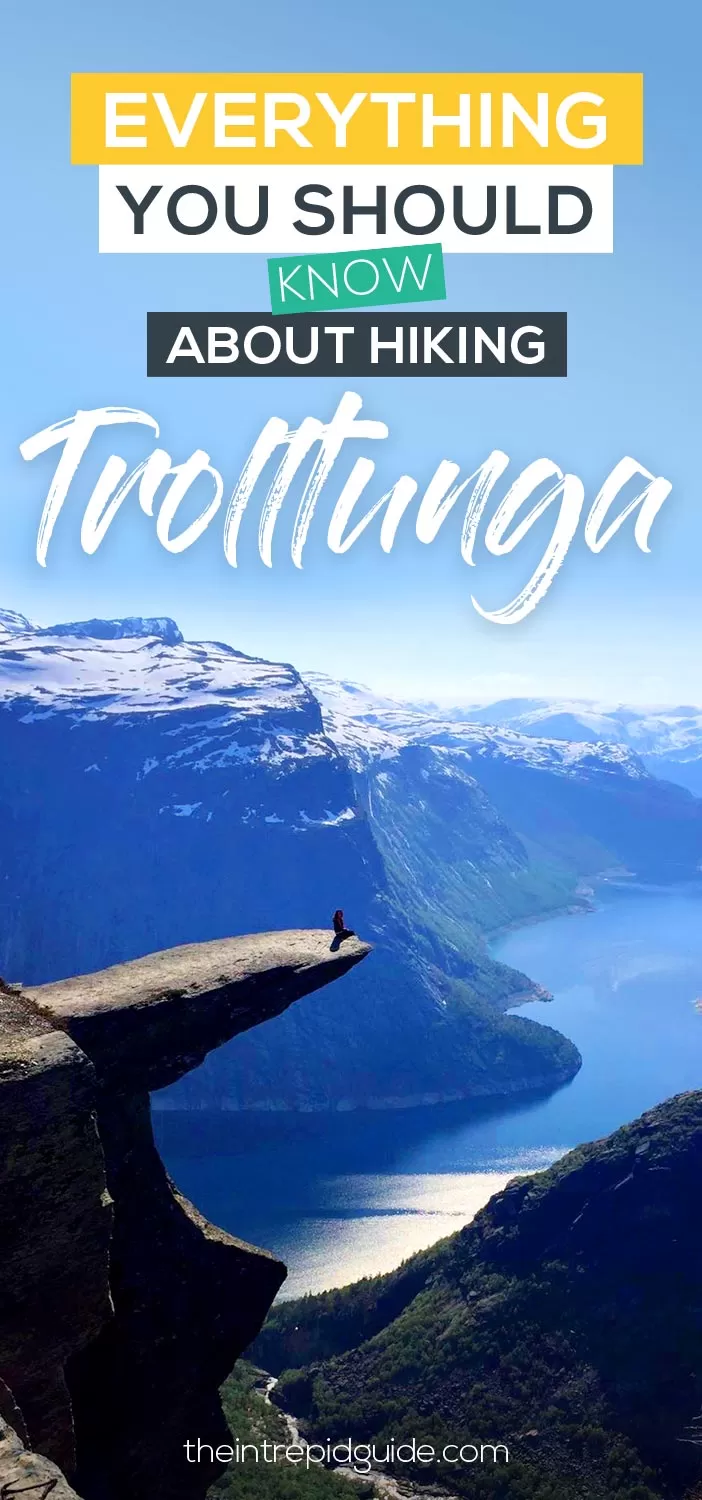
What Is Trolltunga?
Trolltunga, meaning “Troll’s Tongue” in Norwegian, is one of the most spectacular scenic cliffs in the world.
Trolltunga is situated about 1100 meters above sea level, with the ‘tongue’ hovering 700 metres above lake Ringedalsvatnet. The view is simply breathtaking.
The cliff was formed during the ice age, roughly 10,000 years ago, when the edges of the glacier reached the cliff. The water from the glacier froze in the crevices of the mountain and eventually broke off large, angular blocks, which were later carried away with the glacier.
Today, you can still see glaciers on the mountaintops and visit them by guided tours.
Along the way to the ‘tongue’ you’ll be spoiled by gorgeous views of the towering fjord, serene blue water, and breathtaking scenery that no picture can accurately capture.
Originally, Trolltunga was intended to be a multi-day hike however when the funicular was introduced people started making the trek in a single day. The funicular was closed in 2010, but this didn’t stop crazy people like me making the trip in just one day!
How Long is the Hike?
The hike to Trolltunga starts in Skjeggedal, a 6km drive from the main town Odda, and goes through the high mountains. All tourist information I’ve come across accurately calculate the duration of the hike to taking from 10-12 hours, which covers the 23 km return trip to Trolltunga. For my partner and I, it took us 6 hours up, 2 hours at Trolltunga, then 5 1/2 hours back down.
I’ve heard of others completing it 8 hours (they must’ve either sprinted or there wasn’t any snow), so it just depends on your level of fitness.
Am I Fit Enough?
I’m not going to sugarcoat this, hiking Trolltunga is long and difficult. But don’t let that stop you!
I would say the hike is more difficult the earlier in the season that you go as there is still quite a lot of snow to get through and icy slush to avoid.
Even though VisitNorway says on their website that hiking Trolltunga is considered an expert hike, we still saw hikers of all ages and sizes take a crack and reach the tip of the tongue.
The more senior aged hikers seemed to be a lot better prepared with hiking sticks and sun visors while the much younger crowd were running through the snow in soaking wet converse shoes!
During our hike, we encountered plenty of Norwegian’s and other Scandinavian’s powering past us like they were taking a leisurely stroll, but don’t let this disheartened you. Norwegian’s are notorious for dominating tough terrain. No wonder they always perform well at the Winter Olympics! These are the folk who can smash the 10-12 hike time.

During the initial steep ascent, you will no doubt rethink the whole endeavour, as did I, then you’ll look up and see three powerful words inscribed on a rock. YES YOU CAN! Perfectly timed! I promise that this is the most challenging part of hiking Trolltunga. When the pain sets in, it’s more of a mental challenge. Just keep going!
I love my Yoga but I’m by no means a fitness fiend and I still managed to do this hike. We took plenty of mini breaks to lower the heart rate and recoup.
I was, however, sore and tired the following day. You’ll definitely have sore thighs, knees, and calves thanks to that initial intense climb up at the start and coming back down again at the end. My advice is to make sure you don’t plan anything strenuous for the following day.
A touching moment for us was when a lovely Chinese lady in her 60s, with tears in her eyes, said that it was a personal triumph completing the hike and asked us to captured the moment for her with a photo. As I said, it’s a mental challenge more than anything. If she can do it, so can you!
With that said, I’d say that if you’re determined, a bit stubborn, and relatively healthy then you can conquer Trolltunga. YES YOU CAN!
When Should I Go to Trolltunga?

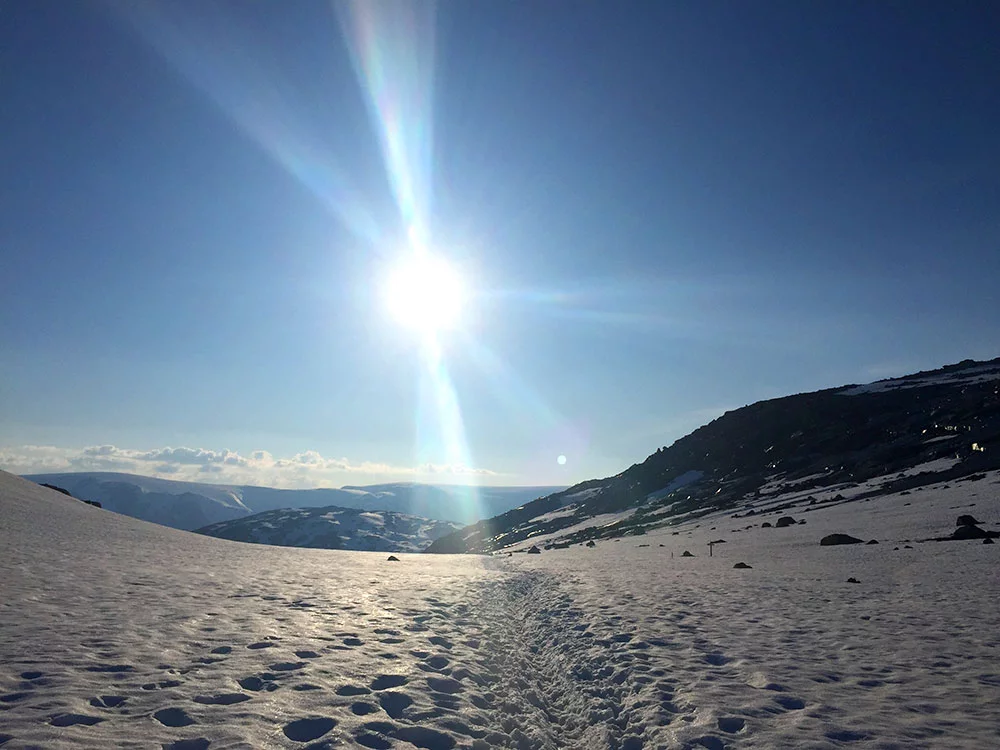
We hiked Trolltunga at the very beginning of the season in June. The hike is usually possible to do from mid-June, depending on when the snow melts in the mountains. If you want to avoid the snow and miss out on the magical white landscape, then go from July onwards when the snow has melted sufficiently. But once autumn hits you’ll have to deal with the rainfall.
We encountered all sorts of terrain, from grassy, rocky, dry, wet, muddy, snowy, and slushy. At the beginning of the season, you’re very likely to encounter deep snow; at least up to your calves.
At the beginning of the hike, an information board warns against loan hikers from setting out on the trail from October 18 – March 18. While from March 19 – June 15 / September 15 – October 15 you can hike with a guide or group. This leaves June 15 – September 15 as the optimum period to make the trek.
Going to Norway? Get my free Norwegian travel phrase guide here
What Should I Expect? (Trail Breakdown)
The return hike trail is about 22 kilometres and covers various terrains, valleys, climbs, and stream crossings. So you have a better idea of what to expect, I’ll give a blow-by-blow recount of each major part of the trail.
These have been grouped into 6 stages:
Kilometers 0-1: The Forest of Steep Stones
Here are some of the questions I’ll cover.


Starting from the carpark in Skjeggedal, you hike up a very steep hill of stones (the ascent is roughly 40 degrees). The path is easy to follow and mostly rocky. Some of the steeper sections or areas with a slick rock face have ropes which provide extra support.

Follow the red T’s painted on rocks piles called ‘cairns’
Overall, the first kilometer is pretty brutal. You’ll be somewhat disappointed once you reach the first 1km sign because it feels like you’ve covered a lot more.
Take a moment during this initial climb to look back down and take in the gorgeous view of the valley and lake.

Waterfall that runs alongside the forest climb
Update: As I mentioned earlier, this first kilometre can be skipped thanks to the new car park at P3 Mågelitopp. No rope pulling for you! Yay!
Kilometres 1-2: The Valley of Cabins


Once you reach the top, the terrain levels out and you find yourself in an enormous mountaintop valley. It is here that you’ll find lots of lovely glacial streams. Perfect opportunity to refill your water bottle. Also in this area, you’ll spot several secluded cabins.
After about a 45 minute walk through this valley, it’s time for another major climb. Instead of rock stairs, the trail takes a steady climb before finally bringing you to an enormous slick rock face. The view of the valley from up there is spectacular. I can imagine that this area would be quite dangerous depending on the time of year.
At the end of the valley, you will see a sign marking 2km of the trail.
Kilometres 2-3: The Frozen Lake

A wonderful frozen lake
At this point, (depending on the time of year you go), you will meet up with either a flowing or frozen lake that twists around before going downhill. Enjoy this downhill portion as it doesn’t last long!
Kilometers 4-5: The Camping Valley
From here you begin another steep incline. At the top, you’ll see another impressive valley with a couple of lakes and an emergency hut in the middle. Inside you’ll find emergency blankets, sleeping bags and stoves for food and heat. If nothing else, be a sticking beak and poke your head inside.
This valley is very popular for camping as the terrain is much flatter and grassy. I hear that there are at least two lakes here but everything was snowed over so it was hard to tell. This would be a great spot to pitch a tent, walk to Trolltunga and back and sleep in the valley before descending the following day. Stargazing here would be incredible on a clear night.
Kilometres 5-7: First Glimpse of Lake Ringedalsvatnet

Impressive views over Lake Ringedalsvatnet
At the top of this valley, you’ll get your first view of the indescribably stunning lake Ringedalsvatnet over which Trolltunga has her views. The view is without a doubt, monumental. Sit down here and take a well-earned rest.
From here, the terrain flattens out a bit more. Most of the climbing is now behind you. From here there are lots of small ups and downs to hike.
Kilometres 7-9: Around the Lake


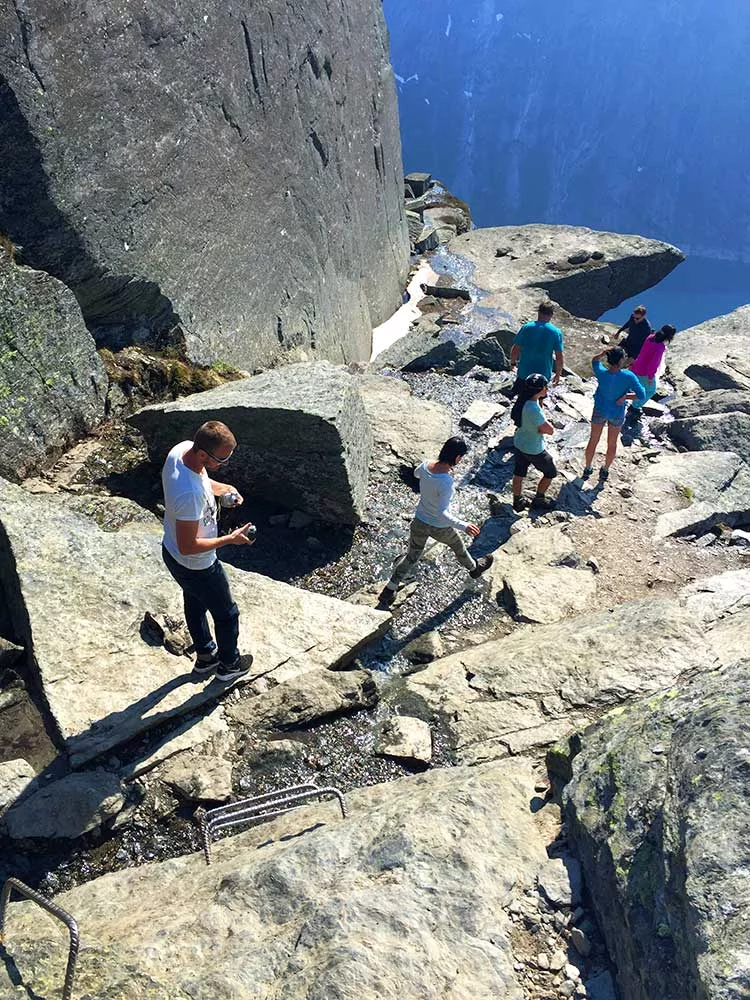
At this point, you’re now about 900 metres above sea level and will encounter a lot of deep snow if you’re there before July. We had to deviate the path a little here to avoid some slushy areas. At points, you can see fast running streams under large openings in the snow. Only once autumn hits will these streams be fully exposed. As you continue on you’ll pass a lovely small waterfall.

Somewhere below this is a stream

Kilometres 9-11: Home Stretch
For me, there was one scary part of the entire hike, including sitting on tip of the tongue. After passing a deep snowed over valley, the ascent on the other side follows a very narrow trail. By narrow I mean 30 cm (1 ft). This would’ve been ok if the track didn’t suddenly change course forcing us to climb up some exposed and muddy rock. The drop is quite high and the slushy snow underfoot is unstable. I was nervous even to turn around. Luckily, some fellow hikers gave me a boost up. Again, you will only see this early season.
With the worst behind you all of a sudden you’ll come around a bend and… there she is! The mesmerising Trolltunga. Halle-freakin-lujah!
Take your time up here. Eat some food, drink lots of water, and get that facebook profile pic you’ve worked so hard for.
How Do I Get to the Tip?
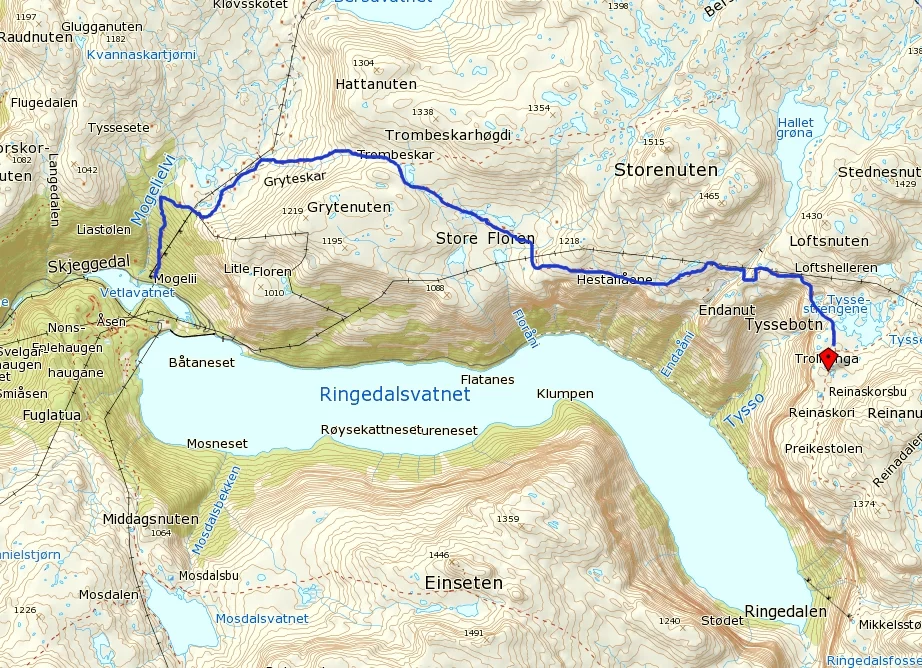
Getting down to the tongue is quite easy. Access is down to the left via four rebar steps embedded in the rock. There is a stream here that turns into a waterfall (if you dare to follow it) where you can fill up your water bottle. After you navigate a few rocks you’ll arrive at the back of the tongue. This is where you’ll queue up ready to have your photo taken.
Ladder down to the tongue. This is where the queue begins
Looking up at the ladder from the tongue
Regardless of photos you’ve seen all over Pinterest, there is actually plenty of space on the tongue. So, you’ll have no issues getting those star jumps and yoga poses right.
The tongue is slightly raised in front which blocks your view of the drop. Sitting on the very tip with your legs hanging over the edge is not as scary as it looks thanks to this incline.
Unlike Preikestolen (another popular and easier hike) that is covered corner to corner with people, Trolltunga isn’t. This isn’t a safety measure, it’s simply out of courtesy to others so everyone can get that perfect shot without being photobombed. The tongue itself feels very sturdy underfoot.
You’ll get somewhat used to the height rather quickly and will feel comfortable to even peer over the edge and get a glimpse of the immense drop.
What is the Journey Back Like?
Allow enough time to get back to the carpark. The walk back will be faster but with both exhaustion and the snow playing part, we only managed to shave 30 minutes off. We didn’t need to stop as much for food, and photos.
The signs marking the kilometres came around a lot quicker on the way back which kept us going.
Sun still high in the sky at 8pm
Depending on how late you make your return you may need to throw on your heavy jacket for the last 3 kilometres.
Before long you’ll be back at the agony inducing steep rock stairs. If climbing up didn’t fatigue your calves and thighs, then going down will be torture.
After an hour of treading lightly you’re finally on the flat terrain. Jump into a change of clothes, freshen up in the toilets and head home for a well-deserved meal and shower. Tonight, you’ll sleep like a baby.

I made it! You can see the pile of hiking sticks on the left
What Should I Wear and Pack?
VisitNorway says hiking Trolltunga requires expert level hikers, which I’d have to agree is spot on; expert not only in terms of fitness, and mental stamina, but also in preparation and organisation. See below for my handy checklist on what to pack and wear.
Clothing and Footwear
- Waterproof hiking boots. No matter what time you go you will encounter all sorts of terrain including, mud, deep snow, and slippery rocks. If you don’t have time to wear in your new boots then get soft sole hiking boots. Anything with a hard sole will give you blisters before you get to the top.
- Plenty of layers – Check the weather before you start the hike, as there is no internet connection once you start climbing. Just because it’s sunny in the car park doesn’t mean the weather won’t change. Anything can happen in 12 hours. Wear breathable jackets and/or shirts so that when you stop for a few minutes to catch your breath, you won’t get cold. And when you begin hiking again, you can take the layer off because you’ll be sweating like a pig. Shorts are great in warmer weather, but make sure you take gaiters if there is still snow.
- 3 extra pairs of socks – Everyone says bring a change of socks but no matter what shoes you wear your feet will get wet either from the terrain or from sweat. To be safe, comfortable, and dry I recommend taking an extra 3 pairs (excluding the one’s you’re wearing) so that you can freshen up your toes every 3 hours. Your feet with thank you for it.
- Change of clothes – If you’re driving, leave a change of clothes in the car. You can get changed in the large public toilets in the car park.
Equipment
- Sunscreen – One massive fail on our behalf was not packing the sunscreen. Reapply often, as you’ll sweat it off quickly!
- Baseball cap, hat, or sun visor
- Sunglasses
- A good camera, extra batteries, and memory stick.
- Hiking sticks (optional) – Some very thoughtful Norwegians have created a pile of sturdy sticks with carved grips found at the base of the hike. For those needing a helping hand along the way, I recommend borrowing a couple. Just remember to return them at the end. I’m so glad I borrowed a pair, they were especially handy in the snow for extra balance. If you already have hiking sticks bring them, if you don’t, then can you borrow some from the base of the first climb. Otherwise, these hiking sticks are a great cheap option.
- Gaiters – If you’re not wearing waterproof pants then protect your legs from the snow with gaiters otherwise the ice will seep into your sock and freeze your feet and ankles.
- A map and compass (optional). Although the trail is clearly marked with bright red T’s painted on large rocks and “cairns”, it can’t hurt to be extra prepared by bringing them.
- Plastic bags – There are no bins along the way so be sure to keep one bin bag and another for wet socks.
- Simple first-aid kit – This compact one is perfect for hiking
- Toilet paper and wet wipes – When mother nature calls, be prepared!
- Sleeping bag – If you’re planning on camping, consider this ultra-compact sleeping bag
Food and Drink
- A thermal insulated bottle – Water definitely isn’t scarce along this hike, all you need in a proper bottle to keep it in. I took this one and filled it up at the numerous streams with beautifully crystal clear cold water. Be mindful that the sun can get hot up there and will quickly heat up any non-insulated bottle.
- Lollies/Sweets/Candies – Wherever you are and whatever you call them, be sure to bring lots of sugar!
- Ready meals – I’ll leave this one up to you, you can either stick with regular sandwiches or try the very popular MRE (Meal, Ready-to-Eat) . If you opt for sandwiches then avoid using ingredients that sweat like lettuce, cheese, and cured meats etc.
- Protein bars and high-energy snacks – 12 hours is a long time you’ll need sustenance!
- Sports drinks – You will sweat a lot no matter the weather, take a couple of bottles of Lucozade to replenish your electrolytes.
Money
- Coins for parking – Parking in Skjeggedal is 200 NOK/day or 100 NOK in Tyssedal. The machines don’t take notes so take coins or a bank card.
General Tips
- There is no mobile phone coverage along the route so do any final weather checks from the carpark.
- If you’re planning to do the hike in one day, start early in the morning, ideally before 9.
- Allow enough time to relax and take in the view once you reach Trolltunga. By the time you have lunch, absorb the views and queue up for photos 2 hours will fly by.
- If you’re planning to camp in the mountains, pitch your tent in the second valley as it will be easier to hike with a lighter rucksack. Other hikers know that stealing someone’s equipment may leave them vulnerable to weather conditions so I think it’s perfectly safe to leave your tent behind.
- The trail is marked out by what are called “cairns,” which are essentially tall rock piles with a large red painted T marking the correct path. Keep an eye out for them. Make sure you follow the red T’s, not other hikers. It’s not guaranteed that they are on the right path. Sometimes we had to look for the signs just to make sure we were going the right way.
- Even though the funicular is closed, occasionally people still climb up the leftover tracks rather than take the rock steps of the normal trail. I advise you avoid this option as the hike up is much more dangerous. One ill-placed foot and you’ll fall straight through one of the slats and risk severely injuring yourself.
- Be prepared for a long hike, get plenty of rest the night before and eat a big breakfast.
- If you’re driving back to Bergen, make sure you check the last ferry times back. The last one leaves around 10:15pm.
- Finally, if you’re worried it’s too difficult, then consider doing the hike in two days and set up camp in the mountains.
Planning a trip and need travel insurance? Get a free quote from World Nomads here.
How to Get to Trolltunga
No matter which mode of transport you take, make sure you get to Skjeggedal where the hike begins. There is nothing more here other than a car park, toilets, and a cafe.
By Car
If you’re staying Bergen and want to hike Trolltunga in one day, make sure you hire a car and leave early. After leaving Bergen in the E16, take the ferry from Tørvikbygd to Jondal. The ferry trip takes roughly 20 minutes and will save you a lot of time driving time. Once you arrive at Jondal, take the right turn out of the port and jump on the Fv107. Follow the signs Odda.
Once you reach Odda, then follow the signs to Tyssedal which is 6 km further up on route 13. From here there is another 7km drive up along a very narrow and windy road to Skjeggedal where the hike begins. You can park in Tyssedal (NOK100/day), which has showers but will require a lot of extra walking to get to Skjeggedal (200 NOK/day).
Check the last ferry times for your return journey so you don’t get stuck on your return trip and have to sleep in the car at the port and catch the first ferry back! This is a an excellent site to compare and book your car rental.
Public Transport
The only real way to do Trolltunga in a day without a car is by staying local. The closest main town is Odda. There is a shuttle bus that runs from 15 June – 15 Sept from Odda to Skjeggedal. They have a pick-up service from all the major accommodations in Odda.
You’ll have to book your ticket in advance on the Odda Taxi website or by calling 53 64 14 44.
There is also a public bus 995 operated through www.skyss.no. No booking is required, pay by cash.
Here is a guide to travel times to Odda:
From Bergen – 3 hours
Bus route 930 Bergen-Odda www.skyss.no. No booking is required, pay by cash.
From Oslo – 5 to 6 hours
Option 1: Take Oslo-Voss www.nsb.no . Bus route 990 Voss-Odda www.skyss.no No booking is required, pay by cash.
Option 2: Coach service “Haukeli ekspressen” Oslo-Odda www.nor-way.no (Book online)
From Stavanger and Preikestolen – 3.5 hours
Coach service “The Trolltunga-Preikestolen express” (during high season) Stavanger-Preikestolen-Røldal-Odda-Tyssedal-Lofthus-Kinsarvik. www.tide.no (Book online)
From Haugesund – 2 hours
From Kristiansand – 6 hours
Guided Tours
If after reading this you decide you want to avoid the long hike, there are guided tours available. One of them is a combination cycle trip and Via Ferrata climb called ‘The Sky Ladder’ that will also get you to Trolltunga. For more information on the Sky Ladder click here. Just note that by taking this guided tour you won’t see the same scenery as shown in these photos as this option will take you on a totally different route.
Tours are operated through the outdoor adventure company Trolltunga Active.
Option 1: Guided tour along the trail to Trolltunga. (end-May – mid-October)
Option 2: A guided bike, hike and via ferrata climb to Trolltunga. (end-May – mid-October)
Option 3: A guide snowshoe hike to Trolltunga (mid-March – end-May)
For more information visit www.trolltunga-active.com
Other popular tours include:
- Sunset Hike in Trolltunga with Overnight Glamping in an Arctic Dome from Tyssedal
- Tree Tenting and Hiking Excursion near Trolltunga in Hardanger
- Overnight Cliff Camping and Hiking near Trolltunga in Hardanger
Where Should I Stay?
If you’re basing yourself in a major town like either Stavanger or Bergen and want to make a day-trip, hiking Trolltunga is absolutely possible. It will be a very long day but that’s what we did and it was totally worth it. The only way to do this is by hiring a car. There aren’t early and late enough modes of public transport in order to do this without a car. We hired a car from Bergen airport the night before due to the late open hours in the morning and left Bergen at 7 am when the public garage opened. The journey took us 3 solid hours to arrive at the start of the hike.
Otherwise, you can always stay local. Trolltunga is surrounded by a lot of small communities so the choice of accommodation is somewhat limited. Here are a few options to consider:
Camping
Depending on the time of year, you can camp in Odda. In fact, according to Norwegian law, you can camp anywhere that is considered public land for free. Many people camp overnight on top of Trolltunga for a beautiful view of the stars. Personally, I think this is a fantastic idea.
Couchsurfing
Accommodation in Norway can be wildly expensive so Couchsurfing is a nice alternative if you’re involved in that community. Norwegians are some of the friendliest and welcome people I’ve ever met so I’m sure this will make your trip extra special.
Hotel or Airbnb
For amazing views from each room in a beautiful Norwegian apartment, I love Vikinghaug. This is a home away from home with its a barbeque and terrace. The reviews speak for themselves.
Alternatively, there are some Airbnb options starting from USD$40 per night. If it’s your first time get US$65 OFF here or get £50 OFF your first stay here, when you sign up using my unique reader referral link. If not, compare prices and book your stay here. There are also a few hotels in the area that cost between $130-$300 a night.
So, there you have it! How to Hike Trolltunga Like a Pro: The Ultimate Step-by-Step Guide. How did I do? I hope you’ve enjoyed this post and found it useful.
If you have any questions, I’d be happy to answer them. Anything to relive this incredible experience ;)
If you’ve been there please share your favourite photo of your experience below.
Like it? Pin it for later!
Impress the locals! Get my free Norwegian travel phrase guide here
Want to see more in and around Bergen? Take a Day Trip!
- Private Tour to Sognefjord, Gudvangen, and Flåm from Bergen
- Zipline at Mt Ulriken in Bergen
- Hardangerfjord Day Trip from Bergen
- City Sightseeing Bergen Hop-On Hop-Off Tour
- Explore Bergen with the Bergen Card
- Bergen Shore Excursion: Bergen Walking Tour
- Panoramic Hike Across Vidden: From Ulriken to Floyen
Check out my other Norway Guides
- 23 Travel Tips You Should Know Before Visiting the Lofoten Islands, Norway
- How to get to Lofoten: 6 Easy Ways to Get to the Lofoten Islands, Norway
- 28 Unique Things to Do in Lofoten Before You Die [A Comprehensive Guide]
- 49 Underrated Things to Do in Oslo, Norway That Are Totally Worth Doing
- 22 Absolutely Free things to do in Oslo You Shouldn’t Miss
- Emanuel Vigeland Museum: Oslo’s Best-Kept Secret
- 11 Awesome Things to do in Stavanger you won’t forget
- The Ultimate Sámi Culture Experience in Tromsø
- 7 Reasons Why You Should Take an Arctic Fjords Road Trip in Tromsø
- The Best Place to See the Northern Lights You Probably Haven’t Heard of
- How to Choose the Best Whale Watching Tour in Norway and Iceland
Over to you!
Are you planning to hike Trolltunga? Have you done the hike already? Would you do it again?
Let me know using the comments section below or join me on social media to start a conversation.
Thanks for reading and I hope you enjoyed this post.
Like what you see? Subscribe using the form below to have all of my posts delivered directly to your email.
22 comments
Hi Michelle,
Thank you very much for a detailed article on how to plan our trip. Me and husband are planning to hike to trolltunga. However, instead of hiking back on same day, we want to spend a night on the top; probably camping. What are the options available? can we camp there? if we can what are the best options for food?
Thanks
Hi Rachana, yes, you can camp there. The only food options are int he car park when you arrive, so you will need to take everything with you. I recommend staying in nearby Odda the day before you hike. For more details on camping, visit the official Trolltunga website here
Hi Michele,
Thanks for the article. I am planning on doing Trolltunga this weekend as long as the weather is good. I am staying in Tyssedal- which is only a 15 minute drive. Actually, a friend with me is going to drop me off and come back later to get me (eek) from the AirBnb there. What are the specifics of just getting to the start of the trail? My airbnb host said something about an upper and a lower base. Can I just GoogleMap directions to Skjeggedal and follow the crowd? Thanks!
Hi Don, this sounds so exciting :) The hike starts in Skjeggedal carpark. There will be a cafe, toilets, and a sign marking the start of the trail (as seen as the start of this guide). Make sure your host drives you all the way up to the carpark. Some people start further down the road and walk up, don’t waste your energy. You’re going to need it! Go as far as the road leads. At this time of year it will be busy, so when in doubt, ask around :) Have an amazing time and remember to wear loads of sunscreen and good shoes!
Thank you so much for this overview! My friend and I are planning on doing this hike at the beginning of July. Neither of us are super experienced hikers but I think we can do it in one day! Only problem is we don’t have water proof hiking boots with us, only your typical trail running shoes and blundstones…. do you think these options would be ok?! Thanks!
Hi Annika! My pleasure :) That’s so exciting! I’m not sure blundstones would be very comfortable and will only make your feet sweat. I would wear something breathable, light, and supportive. While I saw girls do the hike is all sorts of inappropriate footwear, this is a proper hike and so deserves the proper preparation and gear :)
Hi! Everyone keeps saying it is well marked but I am still nervous. We are going Sept 9th. We are not experienced hikers. How often do you see the markers? Thanks!
Hi Elizabeth, yes that’s true. The distance varies a lot and you may have to look for them but it ranges between 100-400metres. Sometimes they are right near each other, and others you will need to look around. Don’t worry too much about this, you’ll be fine :) Let me know how it goes!
Hello, I am planning to climb Trolltunga with my friend on June 16 this summer, do you know if its possible or do we need a guide? We are really exited and your blog has help us for motivation!
Hi Marcela, that’s wonderful news! You won’t need a guide, at that time of year it will be busy with plenty of hikers around. Just be sure to always check for the red ‘T’s’ marked on rocks. Don’t assume other people know where they are going :) Have a wonderful time!
Hi there, great article! I plan to do this alone this summer (end of July). Did u did it alone? And who are going to take ur pic at the tounge if u r travelling solo?
Hi Karen, my pleasure :) So glad you found it useful. I went with my boyfriend so he took photos for me. There will be plenty of people there in July as it’s high season, so you can always ask someone to take photos for you :)
Hello and great article !
My husband and I are climbing Tolltunga in June.
We are 63 and looking forward to the climb !
How do you sit out on the tongue safely ? 🤗
Thanks Laura! It’s hard to advise. You will need to use your own judgment when you arrive as to what you feel comfortable doing. Not everyone sits on the edge, some people just stand in the middle or jump and some do yoga poses while others sit on the edge. It’s really up to you and what you feel in the moment :)
Hi! Thanks for the write-up! I don’t suppose anyone has a .gpx for this trail? I’m sure it’s well-marked, but I like to have a route in my GPS plotted just the same.. :-)
Hi Doug, my pleasure! So glad you’ve found it useful. I don’t have the .gpx unfortunately, but yes, the track is well-marked :) Have a great time!
I’ve made this rout yeasterday, your description helped me during the preparation and supported me a lot, because I was not sure that I am fit enough for this trip. But my doubts decreased after reading of your article. Thanks for inspiration!!!
Hey Victoria! That’s excellent. I’m so pleased to hear that my guide gave you the confidence to take on Trolltunga :) Yay! Did you sit on the tip of ‘tongue’?
Thank you for the detailed account! I’m headed to Norway in a couple weeks and plan on hiking Trolltunga. I was intimidated to do it alone and could find very little info! You’ve eased my mind and I can’t wait now. Cheers!
Hi Kelly,
That’s so wonderful to hear! I’m so glad I was able to give you better insight into hiking Trolltunga. I felt the same way before I went and wanted to create a guide that I would’ve wanted. All the best with the hike and please let me know how it all goes. Any questions, just ask :)
Thanks for another great article. I actually did the Trolltunga hike recently and your accounts and tips are spot on. Although it was a very hard day out at the end it was totally worth it. One more thing to check off my bucket list. Hope to read more great articles from you in the future.
Thanks Basil :) I’d love to go back when the snow has melted and compare the level of difficulty.